



























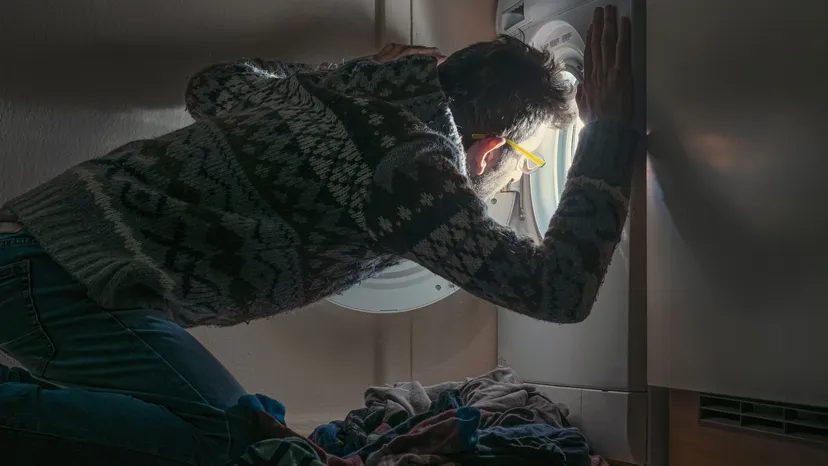
A dryer is basically a big metal drum. You shove wet clothes inside. A motor spins it. That’s the mechanical part. Then heat comes in. Gas or electric. It blows through the drum until the clothes are dry.
Thermostats manage the heat. A timer on the panel manages the speed. It’s simple engineering. But when it stops? You pull your hair out.
First thing to check. The door. Most dryers have a safety switch. If the door isn’t shut tight, nothing happens. It doesn’t matter what you set the timer to. The machine sits there. Dead.
Зміст
Why the Reset Button Actually Works
See that little button on the control panel? It’s not just there for show. It’s a thermal overload protector. Sometimes the motor gets tired. It overheats. The circuit trips.
Here is the trick. You can’t just press it immediately.
Let the dryer cool down. Ten minutes. Give it time to drop in temperature. Then push the reset button. If the motor and the electrical system are fine, it will start again.
Safety First: Unplug the machine. Yes, unplug it. Disconnect the grounding wire. If you’re on gas, close the supply valve. Do not skip this. Electricity and gas don’t care about your patience.
Disassembling the Dryer
If the reset didn’t fix it, you’re looking at internals. You need to open it up.
This isn’t a job for a casual glance. You need to see the motor. You need to see the belts. To do that, you have to take the cabinet apart.
Grab your tools. Screwdrivers. Maybe a nut driver. Keep track of screws. They have homes. If you lose them, you’ll know why the dryer rattles next year.
Start with the top panel. Usually held on by clips or screws along the back edge. Slide it forward. Lift it. Set it aside. Don’t drop it on your toe.
Now you see the drum. You see the motor below. If you’re here, you’re ready to dig deeper. The next steps involve removing the front panel and accessing the belt drive system. We cover that in the next section.
How to strip a dryer cabinet for repairs
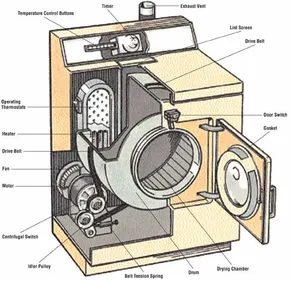
Inside that metal box, every part plays its own game. The drum spins. The heater kicks on. The timer clicks. They don’t talk much, but they rely on each other. Getting inside depends on your specific model. Some manufacturers hide screws. Others use clips. Basic disassembly is straightforward if you don’t rush.
Check the knobs first. Some have tiny setscrews locking them to the shaft. Unscrew them. Pull the knob straight off. Most knobs are friction-fit. Just pull. Don’t dismantle the whole cabinet yet. That’s lazy troubleshooting. Get to the back panel first. Most fixes happen there.
Burned-out light? Easy. You might need to remove a retaining screw or a small panel to see it. Replace the bulb with the exact same type and wattage. Check the old bulb’s base for the specs. Put the panels back on. Done.
If you need more access, here is the order of operations.
Remove the back panel. Unscrew the bolts holding the panel to the top and sides.
Lower front panel. Pull it away from the bottom. Lift up and out. Remove the springs on each side.
Top panel. Wedge a stiff putty knife under the rim. Pry gently. This releases the spring fasteners inside the cabinet walls.
Control panel. Unscrew the panel from the cabinet top or front. Trim pieces might cover those screws. Pry or unscrew the trim first.
Safety stop. If you have a gas dryer, turn off the gas valve. Always. Before disconnecting lines. Before moving the unit. Before touching any wires. Electricity and gas don’t mix well with careless hands.
Why your dryer won’t dry: lint buildup and vent cleaning
Dryers eat lint. It’s their job. But that fuzzy stuff is a menace. It clogs traps. It blocks vents. It packs around the drum rollers. It gets under the belt. The result? Clothes stay damp. Or the machine stops entirely.
Clean the lint screen every single time. Yes, every time. It sits near the door sill or above the control panel. Pull it out. Clear the mesh. Put it back.
The exhaust vent is the bigger problem. Lint accumulates at the exhaust collar inside the dryer and at the wall exit. Clean both ends.
To clean the interior screen, detach the vent hose. Use the clamp or screws. Or just pull it off if it’s an extended collar. Scrub the screen. Reattach it.
For the vent tube itself, grab a vent-cleaning brush. Hardware stores sell them. Push it through. Pull out the lint deposits. Check the joints. Loose connections kill airflow. Sagging flexible plastic tubing creates resistance. The blower has to work harder. That strains the motor.
If the vent is truly clogged, don’t tear down the whole wall. Push a garden hose or a drain auger through the vent until you hit the blockage. Work it out. Disassemble only the nearest joint to remove the debris. You save hours of work this way.
Routine maintenance prevents these headaches. Check the door gasket. Check the thermostat. Check the timer.
How to service the door gasket and switch
Dryers take a beating. The door seal wears out. When it does, hot air escapes. Cool air rushes in. Your dryer works double time. It never finishes the cycle.
Test the seal. Hold a tissue paper against the door rim while the dryer runs. If the paper flutters, air is leaking. If the gasket feels hard, cracked, or warped, replace it. Use the same type.
The door switch is equally important. If the switch fails, the dryer won’t start. It’s a safety feature. The machine refuses to spin if the door isn’t shut.
Before you blame the switch, check the latch. Dirt and lint jam the mechanism. A misaligned latch means the door doesn’t close tight enough to trigger the switch. Clean the latch. Adjust it. Only then should you test or replace the switch.
Testing and Replacing Door and Start Switches
That door switch. It’s the first thing to go. Usually.
You might reach through the outer door panel to find it. Sometimes you have to strip the top off the dryer to get your hands on it. Simple assembly. Two lead wires. That’s it.
Grab your volt-ohm-milliammeter (VOM). Set it to the RX1 scale. Disconnect those leads. Clip a probe to each terminal. Press the switch shut with your finger.
Zero reading? Good.
Needle jumps? Bad news. The switch is dead.
Swap it out. Match the type exactly. Remove the setscrews holding the old one. Swap the wires. Tighten the new setscrews. Done.
Now look at the start switch. Usually a push-button on the control panel. They rarely fail. But they do.
Remove the panel. VOM on RX1 again. Disconnect the leads. Clip probes to the terminals. Push the button.
Zero means it works. A high reading means it’s trash. Replace it. Wire it exactly like the old one. Don’t guess.
Troubleshooting Sticking Thermostats
Thermostats control the heat. Some react to drum temp. Others watch the motor heat.
They stick. It happens. Contacts get lazy. You’ll feel it in the drying cycle.
Check the bulkhead near the exhaust duct. Or the fan housing. You’ll need the back panel off.
Before you test, try this. Tap the thermostat housing lightly with a screwdriver handle. Just a tap. Might jar the contacts loose. If it starts working, you’re good for now. If not, you need to test.
Remove the control panel to get to the switches behind it.
Step 1: Kill the power. Verify it’s off. VOM on RX1. Clip probes to the control panel thermostat terminals.
Zero? It’s alive.
High reading? It’s dead. Replace it.
Step 2: If you’re replacing it, use the exact same type. Wire it like the original. No improvisation.
Step 3: For the operating thermostats, make sure the dryer is cool. Power off. Disconnect the leads on one side of the thermostat. This prevents false readings from parallel circuits.
VOM on RX1. Clip probes to the terminals.
Zero means good. High reading means replace it.
When to Call a Pro for the Timer
The timer sits behind the control panel. It’s the brain. Controls drying time. Controls the heating element. Powers the drum motor.
It’s driven by a synchronous motor.
Here is the hard truth. You can clean contacts on some models. But really? Leave the internal timer adjustments to a pro. Same for the motor repair.
You can replace the whole timer unit, though. That’s DIY-friendly.
Step 1: Access the timer. Remove the front of the control panel. On some models, you can pull the timer out without removing the panel. Pull the knob off the shaft. Slide off the pointer. The pointer is keyed with two flat surfaces so it doesn’t slip.
Step 2: VOM on RX1. Turn the timer to “NORMAL DRY.” Disconnect one power lead. Note: power leads are usually thicker than the other wires. Look closely to spot the difference.
Clip probes to the terminals.
Zero? It works.
High reading? It’s faulty. Buy a new one. Same size. Same type.
Step 3: Replace it. Get a helper. Hold the new timer next to the old one. Disconnect wires one by one. Connect the new wire immediately.
Or draw a diagram. Label every wire. Then disconnect. Then reconnect.
Double-check every connection. One wrong wire and you’re melting the control board.
A dryer that won’t heat is just a tumbler. Useless.
Next up: fixing the heating elements themselves. Gas or electric, the process differs. But the goal is the same. Hot air.
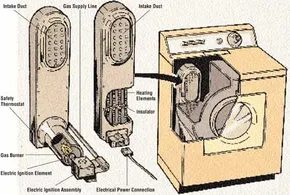
Tuning the Gas Flame for Proper Heat
If your gas dryer is running but the clothes come out cold, look at the burner. Most heat issues in gas units boil down to a messed-up air-to-gas ratio. The fix is usually simple. Adjust the air shutter.
Find the panel covering the gas flame at the bottom of the machine. Unscrew it. Take it off. Turn the dryer on. Watch the flame. Listen.
Is it whistling? Is the flame deep blue? You have too much air.
Is the tip yellow? You have too little air.
Grab the thumbscrew. Or loosen the mounting screws slightly. Tweak the air flow. Keep adjusting until the flame turns a clean, light blue. No yellow tips. No whistling. Just quiet, efficient heat.
Ignore the electric ignition box. It’s sealed. That glowing element inside works like a lightbulb filament. If it burns out, you can’t fix it. You can’t adjust it. Call a pro. Don’t waste time poking at it.
Testing Electric Heating Elements with a Multimeter
Electric dryers use self-contained heating elements tucked in the back. When the heat dies here, it’s usually the element itself. Pull the back service panel off. Get to work.
You need a volt-ohm-milliammeter. Set it to the RX1 scale. Disconnect the power leads from the element terminals. Clip one probe to each terminal.
Watch the needle. Or the digital readout. It should show about 12 ohms.
If it reads higher than 20 ohms, toss it. The element is dead. Replace it with an exact match. Check the electrical rating. A 115-volt line needs an 8.4-ohm element. A 220-volt line needs 11 ohms. Getting this wrong means no heat. Or worse.
Check for grounding too. Set the meter to RX1 again. Remove the power leads. Clip one probe to a terminal. Touch the other probe to the metal housing. The reading should jump high. If it flickers low, the element is grounded. Replace it.
Here is how you swap it out:
- Remove the back panel. Take off the cabinet top if it blocks access.
- Disconnect the wires. Remove the screws holding the heater duct. Lift the whole unit out.
- Unscrew the old element from the duct.
- Slide the new element in. Be careful. Those resistance coils snap if you bend them. Screw it back in. Reconnect the wires. Put the duct and panel back.
Clearing Lint Clogs and Fixing Fan Wobble
Lint is the silent killer of dryer performance. It clogs the air passages through the heater and the drum. The fan can’t pull air. The clothes stay damp.
Fix it manually. Remove the back panel. Unscrew the air duct. Reach inside. Pull out every clump of lint you can find. It’s gross. It’s necessary. Reassemble everything.
Check the fan mounting. A loose screw where the motor shaft meets the drum causes vibration. Open the back panel. Tighten that screw. Close the panel.
Hear a heavy thumping while it runs? That’s not the fan. That’s the drum belt failing. The drum wobbles. The belt slaps.
We’ll tackle the belt and the drum mechanics next. Grab your tools.
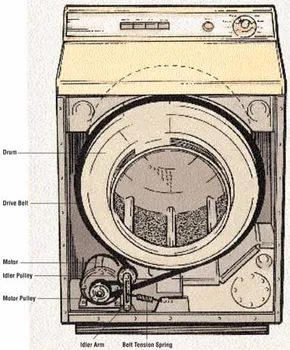
Diagnosing a Broken Dryer Drive Belt
If the drum spins freely when you give it a shove while the dryer is off, your belt is likely shot. Same if you’re hearing a heavy thumping noise every time it runs. Those are the two dead giveaways. Fixing this isn’t rocket science, but you need to be careful not to damage the cabinet or the drum shaft.
First, get to the belt. Remove the back or front service panel. Some dryers require you to prop up the drum so it doesn’t sag. Let it hang loose and you might bend the bolts holding it in the cabinet. Don’t remove more parts than you have to. Keep it simple.
Once inside, look at how the belt is routed. It usually loops around the idler pulley and the motor drive shaft. Sketch it out. Seriously. A quick diagram saves you twenty minutes of confusion later. If the old belt is frayed but intact, leave it on the drum. It’s your template. Cut it off only after the new one is positioned.
Slide the old belt off the pulleys. Stretch the replacement onto the drum. The ribbed side of the belt faces the drum. The smooth side faces the pulleys. Align it carefully. If you can turn the drum by hand after installing the belt, check that it tracks straight. You might need to partially reassemble the cabinet to test this.
Older dryers sometimes use a V-belt system with multiple pulleys of different sizes. To swap these, release the tension on the idler pulley. Thread the new belt into the V-grooves of all pulleys. Then reset the idler. Always use a belt specific to your dryer model. A mismatch changes the drum speed and strains the motor.
Checking and Replacing Drum Bearings
With the back panel off, inspect the bearing around the drum shaft. You may need to remove the belt to see it clearly. If it’s dirty, worn, or loose, it needs replacing.
A screw in the center of the drum holds the shaft. Remove it. Lift off the drum pulley. Support the drum so it doesn’t drop. The bearing is a slip-fit around the shaft. Pull the old one off. Slide the new one on. Secure it exactly as the old one was held.
Some models use a U-bolt and tapered blocks to hold the shaft and bearing. Remove the U-bolt and blocks to take the bearing out. When putting it back together, follow the exact order of disassembly. If there were shims, they go between the bearing and the support channels. Do not overtighten the screws. You’ll crack the bearing housing. If your bearing has a lubrication wick, soak it in auto transmission oil.
Fixing Squeaky or Worn Drum Rollers
The front of the drum rests on two rollers. They’re either metal with rubber rims or pressed nylon. A squeak usually means they’re dry. If they look okay, add a few drops of 20-weight nondetergent motor oil. Not all-purpose oil. That stuff gums up.
If the rollers are worn or the assembly isn’t riveted, you can replace them.
- Remove the front cabinet panel.
- The rollers sit on a metal shaft held by a spring clip. Pry the clip off with a screwdriver.
- Under the clip, you’ll find a washer, the rollers, and another washer. You might need to remove a small nut at the back of the shaft to slide it out.
- Pull the old rollers off. Clean the shaft. Lint and dirt buildup slows the drum and strains the motor.
- Install the new rollers with the washers in the original positions.
Troubleshooting Motor Humming
Motor issues often scare people into calling a pro immediately. Don’t do that yet. Most motor failures come from lack of lubrication, a bad switch, or frozen bearings. A humming sound is a common symptom. It could be a burned-out motor, but it could also be something simpler.
Start by removing the back access panel. Reach behind the drum, motor pulley, and idler arm pulley. If these areas are clogged with lint, the motor is working too hard. Clean it out. Check the belts. A worn or broken belt can cause humming. If the belts look fine, try spraying them with fan belt dressing. It’s cheap and available at hardware stores.
Turn the dryer on. Listen. Is the noise the drum spinning or the motor? Some noise is normal.
If it still hums, force a little 20-weight nondetergent motor oil around the ends of the motor shaft. This lubrication often stops the noise. If that doesn’t work, remove the motor and take it to a repair shop.
Checking the Centrifugal Switch and Motor Bearings
The centrifugal switch is often perched right on top of the motor. If you hear a hum but get no power or heat, this switch is a prime suspect. Look at the terminals. Are they tight? Any signs of burning? If they look rough, don’t guess. Pull the switch and take it to a pro for testing. You’ll likely need a replacement.
Some switches are buried inside the motor housing. You can’t remove those. In that case, pull the whole motor out. Take it to a shop.
Stop. Before you even think about turning the pulley, kill the power to the dryer. Seriously. Check the breaker.
Try turning the pulley by hand. Does it spin freely? If it’s stiff or stuck, your motor bearings are shot. Pull the motor. Take it to a pro. Or just buy a new motor. Sometimes replacement is cheaper than paying for labor and parts on a repair.
Resetting the Overload Protector
Motors have overload protectors. They cut power if the motor gets strained too hard. Many dryers have a reset button on the control panel. If the motor won’t start, wait ten minutes. Let it cool. Then hit the reset button.
Still dead? Check the motor itself. There might be a thermal overload protector attached to the housing.
Test it with a volt-ohm-milliammeter (VOM). Set it to the RX1 scale. Disconnect one wire from the protector. Clip your probes to the terminals.
If the meter reads zero, the part is good. If the needle jumps to a high reading, the protector is faulty. Swap it out. Pry it off or unscrew it. Install a new one of the exact same size and type. Connect the wires exactly as they were before.
DIY Dryer Maintenance and Repair FAQs
Routine maintenance keeps the machine running. You can handle most of this yourself. But when things go wrong, the questions start coming. Here are the answers to the most common issues homeowners face.
Is it cheaper to repair or replace a dryer?
It depends on the damage. The general rule is simple. If the repair cost exceeds half the price of a new unit, buy a new one. Don’t throw good money after bad.
Why is my dryer not generating heat?
A few culprits here. First, check the vent. Is it clogged with lint? That’s the most common issue. Check the circuit breaker. Did it trip? If you have a gas dryer, check the gas flow. Finally, inspect the heating element and the thermal fuse. Both can fail and leave you with cold clothes.
Why won’t my dryer start?
There are many reasons for a silent dryer. It could be a bad thermal fuse. The start switch or door switch might have failed. The drive motor could be dead. This motor turns the drum and spins the blower wheel. A broken drive belt stops everything. The timer could be bad. The belt switch might be open. The control board could be blown. Or you just don’t have power. Check the basics first.
Can tumble dryers be repaired?
Yes. Most can be fixed. But look at the cost. If the repair is expensive, replacement might make more sense financially. Weigh the labor and parts against the price of a new machine.
Why won’t my dryer spin?
A broken drive belt is usually the reason. The belt should have some tension. If the drum turns loosely by hand, the belt is likely snapped or slipped off. It’s a cheap part to replace. Grab a new belt and a screwdriver. You’ll have it fixed in an hour.