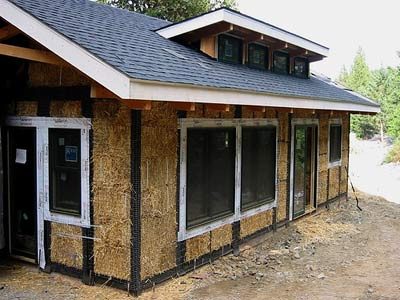
The late 1800s were not kind to pioneers eyeing the northwestern Nebraska Sandhills. You might imagine a standard homestead setup, but the reality was harsh. This region is defined by grass-covered sand dunes. It is a vast, shifting landscape.
Here is the catch. There is no lumber. Not a single tree suitable for building. You cannot chop wood. You cannot buy it either.
The infrastructure was non-existent. No railroad depots stood nearby. You could not order siding or beams from a catalog and have them trucked in. The supply chain simply did not exist.
Sod was another option. Technically, you could cut blocks of earth. But good sod is precious. It is better suited for growing crops. Those crops feed livestock. That livestock keeps you alive. Using prime ground for walls was a bad trade.
So, what did they do? They had to be creative. They had to build with what was at hand. The solution wasn’t easy. It wasn’t pretty. But it worked.
Зміст
The Forgotten History of Straw Bale Construction
It likely started with observation. Maybe a settler remembered how New England farmers used stacked hay bales to insulate ice blocks. Or perhaps the invention of the mechanical baler offered a new way to handle the massive piles of straw. By the late 1890s, these ideas merged. Settlers in the Sandhills region of Nebraska began constructing houses, schools, and churches directly from straw bales.
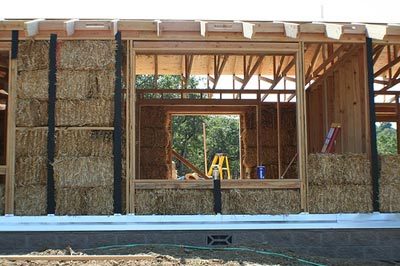
The method was simple. Pile bales one on top of another. Build square or rectangular one-story structures. Cap them with a basic sloped roof.
These early structures were not built for permanence. In fact, they were often temporary. Take the oldest recorded example: a one-room schoolhouse built in 1896 or 1897. It didn’t last long. Cows ate the walls in 1902. Why? Because the walls weren’t plastered.
Once settlers figured out how to apply plaster, the game changed. The straw bales became effective insulation. The walls kept interiors cool in summer and warm in winter. They withstood the violent winds of the Nebraska prairie. They also dampened noise.
One woman recalled her parents playing cards inside their straw bale home, completely unaware of a tornado raging outside.
Construction using this method faded around World War II. Cement and concrete became the standard. Today, we associate straw with the fable of the Three Little Pigs. We imagine the wolf huffing and puffing until the house collapses. But if that pig had a baler and some plaster, he would have had a fortress.
Why Consider a Straw Bale Home Today?
Straw bale construction is gaining traction as a natural building method. In 2001, a British firm estimated that roughly 1,000 new straw bale structures were being built annually worldwide.
The primary driver is cost and availability. With lumber prices rising and supplies shrinking, straw offers a renewable alternative. It is a byproduct of grain production. Farmers use a small amount for fertilizer. The rest goes to waste.
Every year, the United States leaves 200 million tons of straw unused. Because straw is available in most regions, transportation costs are low. This matters. The construction industry and its associated transport produce more than 50 percent of all greenhouse gases. Using local straw cuts that footprint significantly.
The Real Cost Breakdown
Straw itself is cheaper than brick or lumber. But don’t expect a cheap house.
The wall budget accounts for only 10 to 15 percent of total building costs. You still need to pay for the foundation, the roof, doors, and windows. When you add those up, a straw bale home costs about the same as a conventional stick-built house.
Where you save money is in labor, if you DIY.
Straw bale raising parties mimic traditional barn raisings. Groups of people stack the bales like giant building blocks. You don’t need expert skills to participate. The process can move fast with enough hands.
Many websites and DVDs offer guides on how to build your own straw bale house. However, be realistic. Know what you can handle alone and where you need a licensed contractor. Structural integrity and code compliance often require professional oversight.
Insulation and Efficiency
The true financial win isn’t in construction. It’s in operation.
Straw bales finished with plaster have a high R-value. This measures thermal resistance. The walls provide incredible insulation. They keep heat in during winter and block it out during summer.
A straw bale home can reduce heating and cooling costs by up to 75 percent annually. Over the life of the house, that adds up to massive savings.
The thick walls also act as soundproofing. This is why straw bale construction is popular for recording studios and homes near busy highways. If you value peace and quiet, the bales deliver.
Getting Started: Tools and Materials
If you’re serious about building this way, you need to understand the materials.
1. The Bales
Not all straw is created equal. You need dense, dry bales. Loose straw won’t work. It won’t hold shape. It won’t insulate well. Look for square bales. They are easier to stack neatly than round ones.
2. The Plaster
This is the skin. It protects the straw from moisture, fire, and pests. You can use traditional lime plaster. Or modern cement-based mixes. The key is breathability. The wall needs to let moisture escape. Trapped moisture rots straw. Rotting straw ruins the house.
3. The Foundation
Straw is organic. It hates standing water. Your foundation must be high. Concrete block or stone works well. Raise the straw bales at least 6 to 12 inches above grade. This prevents capillary action from wicking ground moisture into the walls.
Safety First
Straw is flammable. Not in the way you might think. A tightly packed bale with good plaster doesn’t catch fire easily. The plaster seals out oxygen. But if the plaster cracks or is missing, the risk increases.
Use fire-resistant plaster mixes. Install smoke detectors. Have a plan.
Also, consider the labor. Stacking thousands of bales is physically demanding. Protect your back. Use proper lifting techniques. Take breaks. Hydrate.
Where to Find Straw
Look locally. Contact grain farmers in your area. They might be willing to sell you the straw that would otherwise be baled and burned. Burning straw releases pollutants. Buying it keeps carbon in place and saves you money.
Transportation is cheap only if the source is close. If you have to haul straw from 100 miles away, the environmental benefit shrinks. The economic benefit vanishes.
Is It Right for You?
Building a straw bale house requires patience. It’s not a weekend project. It’s a season of work.
You need to plan for the plaster. It takes time to dry. You can’t rush the skin. If you rush, cracks will form. Cracks let in moisture. Moisture destroys the bales.
But if you have the space, the time, and the willingness to learn, it’s one of the most sustainable ways to build a home. You’re not just building walls. You’re using a waste product to create shelter. You’re turning a field into a fortress.
The pig had it right. Just add the plaster.
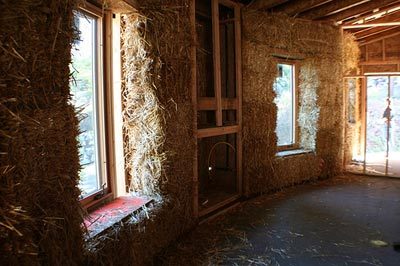

You hear “straw” and think “inferno.” It’s a logical assumption. Loose straw burns. But a straw bale wall is not loose straw. It is dense. It is packed so tight that oxygen cannot get in. Without oxygen, combustion stops. The result is a structure that resists fire better than most conventional wood-frame homes. In fact, the thermal mass and density provide roughly three times the fire resistance of standard construction.
The plaster skin seals everything further. It acts as a thermal barrier. Testing by the National Research Council of Canada backs this up. They exposed straw bale walls to 1,850 degrees Fahrenheit. That is 1,010 degrees Celsius. The walls held strong for two hours. Two hours. That is enough time to get out. And save your photos.
Hay Is for Horses
Get this wrong at the supply stage and the whole project fails. You need straw. Not hay. Hay is dried grass with leaves and seed heads. It is nutritious. Mice love it. Rats love it. If you use hay, you are inviting wildlife into your walls. They will eat the structural material. They will nest. They will cause damage.
Straw is the stalk. It is hollow. It is tough. It is not food. When you pack it correctly and cover it with plaster, you create a fortress against pests. Even if a rodent finds a way in, there is nothing to eat. Contrast this with conventional homes. Drywall and insulation behind the walls create perfect nooks. Warm, dark, food-rich pockets. Straw bale walls with proper plaster simply do not offer that same appeal. Rodents prefer easy access. They hate hard, empty spaces.
Allergy sufferers should pay attention here. Hay contains pollen. Straw does not. Using straw reduces the risk of triggering hay fever symptoms indoors. It is a natural, breathable material. Modern building products often off-gas formaldehyde and other volatile organic compounds. Straw breathes. It regulates humidity. It does not trap chemicals inside your living space.
Decomposition is another factor. Hay rots quickly. It breaks down due to natural bacterial action. Straw is more stubborn. It usually requires additional nitrates to decompose properly. This means the walls stay stable longer. You are not building a house that turns into compost in five years. You are building with material that lasts.
Straw Bale House Design
Stacking bales is easy. Designing a house that works with your specific climate is hard. You cannot just pile straw anywhere. The design must work with nature, not against it. Solar orientation is key. Where does the sun hit your site in winter? Where does it beat down in July?
Map the wind patterns. Does a cold north wind blast your site in January? Place your heavy straw walls there. They act as a thermal buffer. Protect your living spaces. Use the straw bales as a shield for bedrooms or kitchens that need consistent temperatures.
Consider water flow. Where does rain run off your lot? You do not want moisture pooling against your foundation. Straw hates wet feet. Keep it dry. Design your roof overhangs wide enough to shed water away from the walls. Seven feet is a good rule of thumb for eaves.
Look at existing vegetation. Are there mature trees on
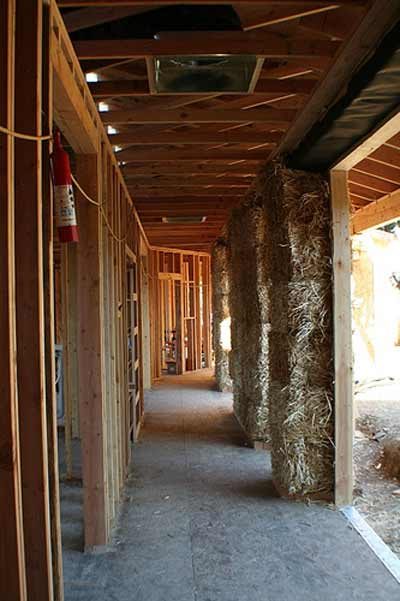

The frame defines the house.
There are two main ways to build with straw bales. The first is post-and-beam infill. Here, you build a skeleton. Wood or steel beams hold up the roof. The bales just fill the gaps. They provide insulation. They don’t carry weight.
This method usually gets approved easier.
Lenders and insurers like it. It looks like standard construction. That makes financing less of a headache.
The second way is load-bearing construction.
Also called Nebraska-style. It harkens back to the first straw bale builders in the Sandhills. No beams. The bales themselves hold up the roof.
The width and density of the bales make them sturdy.
Some builders prefer this. It requires less skill. It uses fewer resources.
But there are limits.
You can’t go very high. Homes are usually one story. You can squeeze in a loft with creative engineering, but don’t expect a second floor.
Wall length is restricted. Building ratios say you cannot have more than 25 feet of unsupported wall in any direction.
Windows and doors are capped at 50% of the wall surface area.
Check your local codes.
Some areas mandate one method over the other. Don’t guess. Verify.
Where do straw bale homes work best?
The movement is strongest in the Southwest.
Desert climates and Southern California dominate the registry. Why? Temperature extremes.
The insulated walls block excess heat or cold effectively. That’s where the value lies.
Moisture is the enemy.
You might think wet climates are out. But straw bale houses stand in the rainy Pacific Northwest. They survive in snowy New England.
Humid climates, however, are risky.
Avoid them if possible.
The Straw Bale Registry tracks these structures. Most are in the United States and China. You can see the global reach. But stick to dry or seasonal climates if you can.
Straw Bale Types
Picking straw matters.
Bales come in shapes and sizes. But two types dominate.
Two-string bales and three-string bales. Named for the wires or twine holding them together.
The U.S. Department of Energy lists the specs.
-
Two-string bale
Dimensions: 18 x 14 x 36 inches
Weight: 50 to 60 pounds -
Three-string bale
Dimensions: 23 x 16 x 42 inches
Weight: 75 to 80 pounds
Use an online calculator to figure out your count.
Harvest Homes has one. Plug in your dimensions. Get the number.
Buy from feed stores or directly from farmers.
Select dry bales.
Use a hand-held moisture meter.
Moisture content up to 20 percent is safe.
Look for golden color. Lighter straw means more moisture. Avoid it.
Bales must be tightly strung.
Lift one. Drop it gently. It should keep its shape.
If it falls apart, walk away.
Straw Bale House Construction
Decide on the structure first.
Load-bearing or post-and-beam.
Then design.
Your choices mirror conventional building.
Any foundation works. Any roof works.
But consider features that boost efficiency.
Solar-paneled roofs are popular.
They enhance environmental friendliness.
They improve energy efficiency.
Match the roof to the frame. Ensure the bales stay dry. Check the codes.
Start digging.

Keeping Straw Off the Concrete
Gravity is your enemy if you let it win. Straw wicks moisture like a sponge, and if it touches the foundation, it rots. You need to lift those bales at least a few inches off the ground.
Builders use toe-ups for this. They are platforms made of lumber and gravel, bolted directly to the concrete foundation. Hammer nails or pins into the toe-up. Place the first row of bales onto those anchors. It locks everything down.
This works for both post-and-beam and load-bearing designs. In a post-and-beam setup, the frame carries the weight. The straw is just filler between the posts. In a load-bearing wall, the straw itself holds up the roof. But in both cases, the ground contact rule is non-negotiable.
Cutting and Shaping Bales
Stack the rest of the bales like blocks. It is satisfying. It is also messy.
Windows and doors go in now. You will need wooden frames. Cut notches into the straw so the frames fit tight. Use a chain saw for the notches. It cuts through the dense straw easily.
Need to change the shape of a bale? Don’t throw it out. Use baling needles. They look like giant sewing needles. Cut through the twine, adjust the density, and re-tie it with fresh twine. You can make the bale fit a specific space.
Integrating Utilities and Storage
Plaster goes on top later. Right now, you are hiding the guts of the house.
Electrical cables are easy. Put them in plastic sheathing and push them directly into the straw walls. It is simple.
Plumbing is harder. Keep pipes out of the straw walls if you can. Use internal walls for plumbing chases. Water leaks in straw are a nightmare to fix.
Want cabinets? Upper cabinets are too heavy for plaster. The plaster will crack and fail. Insert pieces of lumber with spikes into the straw. Drive them deep. These hidden supports will hold the cabinets when you install them later.
Carving Architecture
Your chain saw is your sculpting tool now.
Carve out niches. Create window seats. Add architectural interest directly into the wall mass. You can even carve out spaces for heavier features. The straw holds up well when packed tight.
Some builders slide giant steel or bamboo poles down from the roof into the bales. This keeps everything compressed and in place. Others just use pins and wire mesh. Both methods work. The goal is stability before the plaster goes on.
Plastering and Breathability
Plaster is next. Stucco cement, gypsum, earthen mixes, or lime. All of them work.
Apply the first coat. Work it deep into the straw. Then add two more coats. It creates a shell.
Do not use waterproofing material. You might think you need to seal the walls, but you do not. Straw needs to breathe. Moisture evaporates naturally. If you trap it inside, the straw rots. The plaster must ventilate the moisture.
Use breathable paints. Lime paint. Silicate paint. Some latex paints. These allow the wall to sweat. They let moisture escape. If you seal it up, you kill the wall.
Proper application matters. Get the mix right. Let it dry. The straw stays dry. The house stands.
It is a slow process. The plaster cracks sometimes. You fix it. The bales settle. You adjust. There is no perfect finish. There is just a wall that works. And you built it.
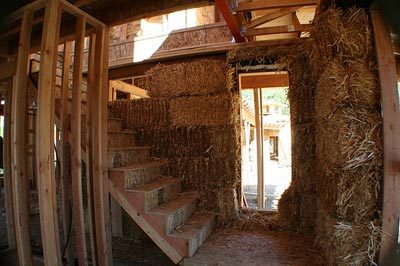
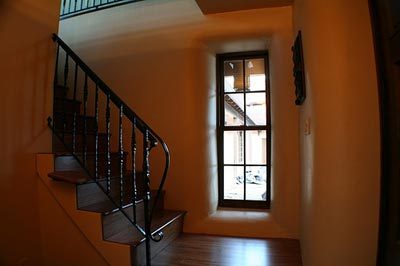
Managing Moisture in Straw Bale Construction
Water is the enemy. Specifically, it’s the physical problem that defines straw bale building. When those bales get wet, mold takes hold. The straw rots. You lose the structural integrity and the insulation value.
Prevention starts before the first nail is driven. It begins with the purchase.
Store bales correctly on site. Never let them sit directly on the ground. Use pallets or blocks to create an air gap. Cover them with tarps immediately. If it rains during construction, exposed bales are ruined. You can’t un-wet them.
Design is your first line of defense.
The goal is simple: keep liquid water out while allowing vapor to escape.
Think about the roof. Overhangs are non-negotiable. They shield the walls from direct rain and snow. Just as you raised the foundation toes to block ground moisture, wide eaves block sky moisture.
Windows and joints are weak points. Seal them carefully. Use flashing and caulking where water loves to pool or seep.
But liquid isn’t the only threat. Air carries moisture too.
This is where breathable plasters matter. We talked about this earlier, but it bears repeating. The plaster allows humidity inside the house to migrate out. It prevents trapped vapor from condensing inside the wall cavity.
If you use non-breathable materials, you trap that moisture. Then you get mold. Then you get rot.
Maintenance is simpler than you might think, but it requires vigilance.
Cracks in the plaster are the primary maintenance issue.
Why do they crack? Settling. Temperature changes. It happens.
If a crack goes untreated, it becomes a highway for water and air. Inspect your walls regularly. Spot-check the plaster. Fill small cracks early. If you let them grow, moisture accumulates in the walls.
Fixing a crack is easy. Replacing rotted straw is not.
Keep the envelope tight. Keep the plaster intact. It’s a delicate dance between blocking rain and breathing with the seasons. Miss one part, and the whole system fails.
Does your local climate demand extra overhangs? Or more frequent inspections? That depends on how much rain falls where you live. But the rules stay the same.
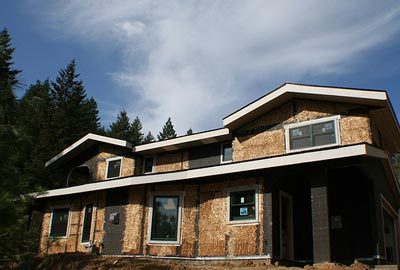

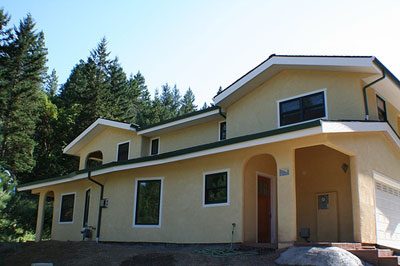
Straw bale isn’t just a niche trend. It’s a structural system that fights against the grain of modern construction norms. The biggest hurdle isn’t the bales themselves. It’s the paper trail.
Traditional building codes rarely mention straw bale. They don’t have a checkbox for it. You are essentially asking an inspector to validate a method they likely never learned in school. This creates a friction point that doesn’t exist with stick-framing.
Then there’s the money. Banks are risk-averse. To a conservative lender, straw bale looks like a science project, not a mortgageable asset. Insurance agents feel the same way. They see fire risk where you see thermal mass. They see moisture issues where you see breathable walls.
Navigating Regulatory and Financial Walls
You cannot simply file plans and expect a permit stamp. If you are building in a jurisdiction where straw bale is uncommon, you are in negotiation mode from day one.
Work with your local building official early. Not at inspection time. At the design phase. You need to prove compliance. This often means hiring a structural engineer or a consultant who specializes in alternative building methods. They act as a bridge. They translate your straw bale specs into language the code official understands.
Financing requires more data. You need third-party validation. A consultant’s report on the structural integrity of your walls can sometimes convince a skeptical loan officer. Be prepared to educate. Bring brochures. Bring R-value charts. Show them the fire resistance tests.
Insurance is trickier. Some carriers will write off the policy entirely. Others will charge a premium that makes the project uneconomical. Shop around for companies familiar with natural building. National organizations often maintain lists of insurers who cover natural homes. Don’t assume your current provider will bite.
Locating Specialized Labor
Finding a general contractor who knows how to stack bales is like finding a needle in a haystack. Most contractors stick to what they know. They know wood. They know steel. They do not know straw.
” The Last Straw” journal, a quarterly publication dedicated to the craft, maintains a directory of professionals. It is a starting point, not a guarantee. You can also search green builder databases like the one at greenbuilder.com. But these directories often list eco-conscious builders, not necessarily straw bale specialists.
The strategy might shift from hiring one contractor to hiring multiple specialists.
- Find a framing crew for the shell.
- Hire a plasterer who understands earthen mixes.
- Contract a roofer who knows how to handle the wide eaves these homes often require.
This fragmented approach requires more management from you. You become the general contractor in all but name. You need to know how to sequence the work. If the plasterer arrives before the bales are stacked and dried, you have a problem. If the roof isn’t on before the first rain, your walls are ruined.
The Resale Reality
Will your straw bale home sell? Data is scarce. Mostly because people who build these homes tend to live in them for decades. They are not flipping houses. They are planting roots.
Some market analyses suggest straw bale homes appraise lower than comparable conventionally built homes. Appraisers use comparable sales. If there are no other straw bale homes on the block, they use the nearest conventional home. They adjust for differences. Often, they adjust down for “unusual construction.”
But this is a negotiation. An educated owner can fight this. When showing the house to a buyer, you are not selling square footage. You are selling comfort. You are selling low utility bills. You are selling a non-toxic environment.
Walk a potential buyer through the wall section. Show them
Tying the Addition to the Existing Structure
Start by anchoring the new structure. You are not building a free-standing wall here. It has to marry with what is already there.
Lay your first row of bales. Then comes the critical step: place metal mesh lath over them. Secure it with dowels or landscape pins. Fold that lath at a 90-degree angle. Staple it to the existing house frame. If your addition uses wooden framing, skip the mesh step. Just attach the new frames directly to the old ones. Plaster follows the standard straw bale protocol.
Foundation and Exterior Alignment
A contractor can help match exteriors. But you need to handle the base. Calculate the thickness of the bales plus plaster early. The finished addition must line up with the existing house. No lip. No gap.
For the foundation, consider the added width. You might need to extend the footing. Attach the new concrete to the old using epoxy or anchor bolts. Build toe-ups. Keep the straw off the ground. Moisture is the enemy.
Retrofitting Your Existing Home
Can you wrap your current house in straw? Yes. It improves energy efficiency significantly. But the design must fight moisture.
Old homes usually have shallow eaves. Straw needs protection from rain. You may need to change the roof slope. Extend the overhangs.
This brings up the cost question. Is it worth it?
Internal vs. External Retrofitting
Placing bales on the exterior changes how doors and windows work. Standard 18-inch bales create deep wells. You will have to remodel every opening.
There is an alternative. Retrofit with bales on the inside. The process is similar to new construction. But you lose floor space. The width of the bales eats into your room dimensions.
If you go external, you have to prep the bales differently. Dip them in earthen-based plaster before stacking. Then set them up. Do not tie them flush against the siding. Moisture will wick from the existing walls into the straw.
Use wire netting between the house and the bales. Create a ventilation gap. Air needs to move.
Weighing the Investment
Changing the roof line. Expanding the foundation. Adding tons of material.
It looks expensive on paper.
Compare that number to the energy savings over the life of the house. The math often shifts.
Resources for the DIYer
- StrawBale.com
- Green Home Building: Strawbale
- The California Straw Building Association
- The Last Straw


